What is Alfresco?
- Alfresco is a friendly team-based collaboration ECM (Enterprise Content Management System).
- Alfresco comes in three flavors:
- Community Edition - It has some important limitations in terms of scalability and availability, since the clustering feature is not available to this edition.
- Enterprise Edition – It supports clustering, its design is geared towards users who require a high degree of modularity and scalable performance.
- Cloud Edition – It is a SaaS (Software as a service) version of Alfresco.
What Is Amazon S3?
- Amazon S3 is cloud storage for the Internet. It is known as Simple Storage Service on Internet.
- It is designed to make web-scale computing easier for developers.
- Amazon S3 provides a simple web-services interface that can be used to store and retrieve any amount of data, at any time, from anywhere on the web.
- It stores data as Objects and objects are stored with-in folders that are called Buckets. You can also apply permissions on the buckets, so it is private until you share it.
- Buckets are containers for Objects, you can have one or more buckets. You can also set permissions on buckets such as who can create, delete and list objects in the buckets.
- The service aims to maximize benefits of scale and to pass those benefits on to developers.
- Amazon AWS provides regions for all aws applications and one of them is S3.
- AWS has regions all over the world. Utilizing regions can reduce the latency to the end users since the application/data they need to access can be geographically closer.
Why Alfresco?
• Its rich feature set is completely accessible over a REST-based interface and can be extended and enhanced with simple server-side JavaScript (i.e. no compilation required). although Java and Groovy etc. are common choices.
• It allows for management of data of any format (not only document content and images).
• It provides rich collaboration tools such as wiki, forums, issue log etc. and functionality to edit and manage image files.
• It enables easy web designing for people, who are not technical users.
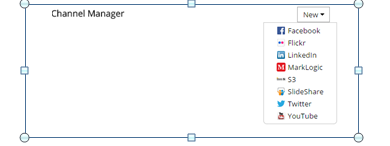
• It provides publishing channels such as Google Docs, YouTube, Flickr, Slide Share, Facebook and LinkedIn out of the box.
• Office documents can be edited within CMS using Google Docs as well as offline using its built-in checkout feature.
• Rich Add-ons from Community i.e. plug-ins/tools can be integrated with Alfresco easily.
• Alfresco is compatible with most commonly used operating systems like Linux, MAC and Windows; it can be fully integrated with an organization's office suites like Microsoft Office or OpenOffice.org.
• Supports workflow with help of Activity and JBPM.
• Supports multiple databases.
• Provide search for the uploaded documents using Lucene API
Note: Alfresco use a library called Apache PDBox library (open source java lib) for extracting the texts from PDF and index them. (http://pdfbox.apache.org/)
Why Amazon S3?
- It can be used to store and retrieve any amount of data at any time from anywhere on the web.
- Highly scalable, reliable, secure, fast, inexpensive infrastructure that Amazon uses to run its own global network of web sites.
- You avoid having to buy hardware and paying for the storage that isn't being used.
- Amazon S3 is very affordable solution for hosting data on the web since you only pay for the bandwidth and storage you use.
- It is commonly used for backup and storage. For e.g. you want to build a website for your, you can store the static content on S3 securely for faster retrieval and reduces cost.
- It also allows versioning of data, so you can record the day to day changes and also roll back to previous version at any time.
- It is free for 5GB of storage and 20,000 GET requests. Which means, you can store contents up to 5GB free and they can be viewed 20,000 times every month free!
- Beyond that, the rates are very nominal and a summary is provided below.
- For 1 TB storage (approx 1000 GB) the price is $0.095 per GB/month.
- Let's look at the meaning and analyze. Suppose you have 32 GB of contents. You get 5 GB of storage free. So for 27 GB you have to pay 27 x $0.095 = $2.65 a month.This rate is applicable till you reach 1000 GB.
- Amazon charges for each request to the content and that is $0.004 for 10,000 requests after the free slot ends. Considering, your content has 50,000 views a month your expense will be $0.004 x 3 = $0.012.
- Summing up, to store and stream 32 GB of contents on Amazon S3 your monthly expense will be $2.65 + $0.012 = $2.662 !
- Reference: http://aws.amazon.com/s3/
Union Benefits:
- Alfresco can be used as an editorial and content production system, so you can create, curate, edit, and workflow and semantically enrich your content.
- At present you need file system storage to store the contents in Alfresco. As the content size increases more and more file system storage is required. This will require upgrading/increasing the file storage space and it is cost prohibitive.
- While using Amazon S3 as a content store you don’t have to worry about Hardware cost, Maintenance cost. Amazon provides very cost effective storage space in S3. Example of this is discussed above.
- Using amazon aws together you have all the benefits of true cloud computing which allows you to scale storage or computing power based on actual usage.
Amazon S3 Cloud Store and Alfresco Integration:
Follow the below given steps to integrate S3 with alfresco:
1. Download the alfresco-s3-integration plug-in from the
below given repository.
https://github.com/abhinavmishra14/alfresco-amazon-s3-content-store-integration.git
2. Import the plug-in into your eclipse.
3. Open the build.xml and execute the “deploy-war” ant
target.
4. It will automatically apply amp file to war files.
5. If you want to create the amp file manually apply amp
to alfresco.war file then follow the below given steps.
a. Copy the amp to tomcat/webapps dir after packaging the
amp file.
b. Copy the alfresco-mmt-command-line-2.1.jar file to
tomcat/webapps directory.
c. Open command prompt/shell
d. Navigate to the directory tomcat/webapps directory.
e. Execute the following command, it will install the amp
file to alfresco.war and takes the backup of old war file.
C:\Alfresco\tomcat\webapps>
java -jar alfresco-mmt-command-line-2.1.jar install C:\Alfresco\tomcat\webapps
C:\Alfresco\tomcat\webapps\alfresco.war -force –directory
f. To ensure that whether module is installed or not,
execute following command.
java -jar
alfresco-mmt-command-line-2.1.jar list C:\Alfresco\tomcat\webapps\alfresco.war
g. It will display following info:
Module
'cloudstore' installed in ' C:\Alfresco\tomcat\webapps\alfresco.war '
6. Before restarting the alfresco follow the below given steps.
- Open the postgresql console.
- Drop the database [" drop database alfresco " ]
- Create the database again, run below commands.
create database
alfresco;
- Delete following directories which contains solr indexes.
/alf_data/solr/archive/SpacesStore/*
/alf_data/solr/workspace/SpacesStore/*
/alf_data/solr/archive-SpacesStore/alfrescoModels/*
/alf_data/solr/workspace-SpacesStore/alfrescoModels/*
7. Now restart the alfresco and monitor the log files. You
will see following log messages:
Loading access
keys from 'alfresco-global.properties’.
8. After that go to Amazon S3 Console and refresh. You
will see a directory named ‘store:’ in web browser. Keep refreshing you will
see all the contents which is present in “C:\Alfresco\alf_data\contentstore”
9. You can also view the console in Eclipse if you have
AWS SDK installed.
Union Benefits:
- Alfresco can be used as an editorial and content production system, so you can create, curate, edit, and workflow and semantically enrich your content.
- At present you need file system storage to store the contents in Alfresco. As the content size increases more and more file system storage is required. This will require upgrading/increasing the file storage space and it is cost prohibitive.
- While using Amazon S3 as a content store you don’t have to worry about Hardware cost, Maintenance cost. Amazon provides very cost effective storage space in S3. Example of this is discussed above.
- Using amazon aws together you have all the benefits of true cloud computing which allows you to scale storage or computing power based on actual usage.
Amazon S3 Cloud Store and Alfresco Integration:
Follow the below given steps to integrate S3 with alfresco:
1. Download the alfresco-s3-integration plug-in from the
below given repository.
2. Import the plug-in into your eclipse.
3. Open the build.xml and execute the “deploy-war” ant
target.
4. It will automatically apply amp file to war files.
5. If you want to create the amp file manually apply amp
to alfresco.war file then follow the below given steps.
a. Copy the amp to tomcat/webapps dir after packaging the
amp file.
b. Copy the alfresco-mmt-command-line-2.1.jar file to
tomcat/webapps directory.
c. Open command prompt/shell
d. Navigate to the directory tomcat/webapps directory.
e. Execute the following command, it will install the amp
file to alfresco.war and takes the backup of old war file.
C:\Alfresco\tomcat\webapps>
java -jar alfresco-mmt-command-line-2.1.jar install C:\Alfresco\tomcat\webapps
C:\Alfresco\tomcat\webapps\alfresco.war -force –directory
f. To ensure that whether module is installed or not,
execute following command.
java -jar
alfresco-mmt-command-line-2.1.jar list C:\Alfresco\tomcat\webapps\alfresco.war
g. It will display following info:
Module
'cloudstore' installed in ' C:\Alfresco\tomcat\webapps\alfresco.war '
Example:
- Title: Cloud Content Store
- Version: 2.0
- Install Date: Mon Jun 16 16:42:12 IST 2014
- Desription: Alfresco Cloud Content Store
6. Before restarting the alfresco follow the below given steps.
- Open the postgresql console.
- Drop the database [" drop database alfresco " ]
- Create the database again, run below commands.
- Delete following directories which contains solr indexes.
/alf_data/solr/archive/SpacesStore/*
/alf_data/solr/workspace/SpacesStore/*
/alf_data/solr/archive-SpacesStore/alfrescoModels/*
/alf_data/solr/workspace-SpacesStore/alfrescoModels/*
7. Now restart the alfresco and monitor the log files. You will see following log messages:
- Open the postgresql console.
- Drop the database [" drop database alfresco " ]
- Create the database again, run below commands.
create database
alfresco;
grant all on
alfresco.* to alfresco@localhost identified by 'alfresco';
grant all on
alfresco.* to alfresco@localhost.localdomain identified by 'alfresco';
- Delete following directories which contains solr indexes.
/alf_data/solr/archive/SpacesStore/*
/alf_data/solr/workspace/SpacesStore/*
/alf_data/solr/archive-SpacesStore/alfrescoModels/*
/alf_data/solr/workspace-SpacesStore/alfrescoModels/*
7. Now restart the alfresco and monitor the log files. You will see following log messages:
Loading access
keys from 'alfresco-global.properties’.
S3ContentStore
Initializing, accessKey: xyzzzz
secretKey: xxxxxx and bucketName: test_bucket
S3ContentStore
Initialization Complete
8. After that go to Amazon S3 Console and refresh. You
will see a directory named ‘store:’ in web browser. Keep refreshing you will
see all the contents which is present in “C:\Alfresco\alf_data\contentstore”
9. You can also view the console in Eclipse if you have
AWS SDK installed.